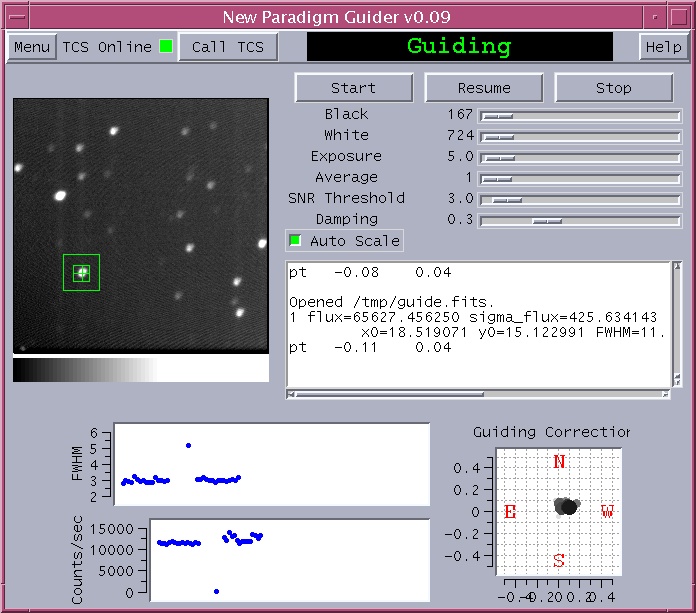
LFC Guider Quick Start Guide

This document will help you get started with the LFC guider.  The
guider itself is a SITe 512x512 CCD located ~ 500 arcseconds East
and 600 arcseconds South of the center of the science field.  The
science filter also covers the guide chip.  When the science chips
are in focus, the guider should be in focus, too.  However, beware
of the U band!

The guider must be started for complaint-free operation of the LFC
since the CCD control software (mcdcom) talks to the telescope via the
guider.

You may be astonished to learn that this program still contains bugs.
A list of the known "issues" is listed below.  Please let me know if
you find more.

Starting the Guider

Hmm.  I'm not actually sure how this is officially done.  In a worst
case scenario, you can start the guider by typing
"/usr/ccd/lfc/guider/guider.tcl".

If everything starts correctly, you'll see a rather large window
appear on your screen with the title "LFC Guider, v?.??".  The main
status window in the top of the window will say "Not Guiding" in red.
The guider immediately tries to connect to the Telescope Control
Computer (TCS).  You will see the "TCS Online" LED blinking between
red and green while the guider is connecting.  (If, after ~10 seconds,
the LED does not turn green, you should consult a technician.)

The Paradigm

The guider works differently than the Shepherd Guider.  Tough.  When
the "Start" button is pressed, the guider starts guiding.  It uses the
first frame it receives to center the sky box.  Thereafter, the guider
will attempt to keep the star centered in the sky box.  When the
guider is not guiding, pressing the "Resume" button will cause the
guider to start guiding, but it WILL NOT MOVE THE STAR BOX.  The idea
is that you should use the resume feature if you've lost guiding for a
brief period and would like to bring the guide star back to its
original position in the center of the box.  (Pressing resume while
the guider is guiding will do nothing.)

The Guider Graphical User Interface

The guider graphical user interface is dividedinto three sections.
The top bar provides access to a menu of fancy commands, the TCS
status and a "Call TCS" button, a master status window, and a help
button (which you must have discovered if you are reading this).  The
middle portion of the guider contains the guider image and colorbar, a
host of gizmos for adjusting the main parameters of the guider, and a
text panel that records information and warnings.  The botton third of
the interface contains three plots: two strips charts reading off the
flux and FWHM of the guide star and a radar plot showing the location
of the guide star relative to the guiding center for the previous 16
guide images.

More details are available below...

Operation

Read the paradigm section above.

Once you have a guider image displayed, move the sky (outer) and star
(inner) boxes to the star.  The star box must be inside the sky box,
but it does not have to be centered with respect to the sky box.  The
automatic scaling generally does a good job, but you're welcome to
adjust the scaling manually using the "Black" and "White" sliders.
The guider chip exposure time and the number of frames to average
before displaying and attempting to guide are adjusted with "Exposure"
and "Average" sliders, respectively.  The SNR threshold slider
modifies the minimum signal-to-noise ratio required for the guider to
think it has actually seen the star.  The damping slider changes the
constant multiplied by the measured offset to obtain the corrections
sent to the telescope.  (If you move the damping up to 1., you'll
experience very unstable guiding.)

The guider will automatically display guider images as soon as they
are available.  Guiding is as simple as moving the boxes around a
suitable star and pressing "Start."  The star box will center itself
on the star, and you'll be merrily on your way (I hope).  As guide
frames come in, the guider will send guiding corrections to the
telescope if necessary and plot the FWHM (arcsec), normalized flux (flux
divided by exposure time), and the location of the star relative to
the guiding center.  When you'd like to stop guiding, press "Stop."

If the star fades from view, the guider will let three frames go by
before sounding an alarm and ceasing to guide.  (Of course, the guider
will not send corrections to the telescope when it cannot detect the
guide star.)

Remember, if the guider is not functioning properly, you can always
hand guide by setting the guider into manual guiding mode.

Details
The Menu Button
The menu button, surprisingly enough, provides access to a selection
of nifty commands.  The first is the Black-Belt Status.  Unless you
have an LFC black belt, it's best not to mess with the stuff there.
The next selection is "Disconnect TCS," which terminates the
connection to the TCS.  For those, hopefully infrequent, case in which
the guider refuses to guide sensibly, there is a "limp" mode called
"Manual Guiding Mode."  In this mode, the guider displays cross hairs
centered in the star box, and you (i.e., you, the human being) guide
manually using either the paddle or the arrow keys (which will move
the star in the direction of the arrow 0.1 arcseconds*).  In case the
guide and/or star boxes vanish, you can retrieve them by selecting
"Reset Guide Boxes."  The coordinates in the upper left of the screen
can be toggled on or off using the "Toggle Coordinates" item.
Finally, "Quit" quits.

*To be precise, you are actually moving the telescope, not the star.

The Display Window
The display window provides a 256 x 256 panel for viewing the guider
images.  The "stretch" can be adjusted by holding down the right mouse
button and moving around.  The color bar at the bottom of the panel
will update to reflect changes in the stretch.  The sky and star boxes
can be manipulated using the mouse.  Clicking on a box frame with the
left mouse button will allow you to move the box.  Clicking on a box
frame with the middle mouse button will allow to resize the box.

The Start, Resume, and Stop Buttons
The "Start," "Resume," and "Stop" buttons cause the guider to start
guiding, resume guiding, and stop guiding, respectively.

The Sliders
The sliders were already described above.  For fine adjustments, use
the left and right arrows.

The Message Panel
Lots of information is printed out in this panel.  Most of it can be
safely ignored.  Messages that are printed in red are errors and worth
contemplating.

The Stripcharts
The two stripcharts plot the full-width half-maximum (in arcseconds)
and the flux (normalized by the exposure time) of the star.  The
charts are 100 frames long and will automatically adjust their
vertical scales.  If you become unhappy with the vertical scales, you
can reset the charts by selecting the "Reset Stripcharts" command from
the main menu.

The Radar Plot
Last but not least, the "Guiding Corrections" radar plot shows the
location relative to the guiding center of the star in the previous 16
frames.  The location from the most recent frame will be marked the
largest, darkest circle.  As new frames come in, the mark will be come
smaller and lighter.  Cool, eh?

Features, Issues, and Bugs

Naturally, this program is far from perfect.  It still crashes on
occasion.  If it does so while you're using it, please send me as
detailed a description as possible of the event.  Don't save the core
file, however.  I haven't a clue what to do with them.

The program uses a very simple intensity-weighted centroid for
determining the center of the star.  If the object you're trying to
guide on is very faint or out of focus, the program may exhibit
erratic behavior.  You can monitor the corrections being sent to the
telescope in the message panel and in the radar plot.  Since the focus
chip is not always in focus when the science chips are in focus, you
should approach the measured FWHM values with a certain amount of
skepticism.  They are, nevertheless, useful for identifying trends.

Eventually, the guider will have a mode in which it searches
automatically for a guide star.

If the sky and star boxes disappear, use the "Reset Guide Boxes"
command (selected from the main menu) to restore them.