Meetings: Mondays 4-7 pm and Wednesdays 3-6 pm
The laboratory sessions are twice each week, roughly 3 hours per class meeting. Each week will begin with a short lecture in 219 Cahill followed by laboratory work in 29 Cahill -- basement level, southwest corner, phone number x8481. There are two optical benches in the teaching lab. Depending on enrollment, you will work in groups of 2-4.
After the lab work is completed analysis and interpretation will be required. There is a student account for this course on the Ay computing cluster with software including various programming language compilers, plotting packages, IDL, IRAF, etc. Many students work outside of this infrastructure, but please ask for access to the account if you need it.
-- Schroeder, D.J. (2000), Astronomical Optics
-- Rieke, G. (2003), Detection of Light
-- Howell, S.B. (2000), Handbook of CCD Astronomy
-- Glass, I.S. (1999), Handbook of Infrared Astronomy --
access via Caltech Connect
These materials are also on the Caltech course reserves list for this term.
In addition to the science you will learn, working with your peers in the lab will help develop the ``life skills" of: teamwork, critical thinking, creative problem solving, and communication.
In preparing the latter, you should imagine that you are explaining your work to a reader who has not done the experiment, rather than merely accounting for your presence in the laboratory. Please do not simply present tables of measurements, unlabeled plots, and no discussion or conclusions. The lab reports are expected to consist of the following sections:
The first section could be recorded in your lab book before coming to class or you may leave room for its addition later. The next equipment, measurement, and some of the analsyis sections should be recorded during the lab session. Try to get in the habit of recording everything you do in your book as it is done. If you find that these recordings suffer in legibility or organization, you can summarize the important measurements on the following pages later. As you will be doing the experiments in groups, the in-class effort will be divided in that you will collectively figure out how to set up the equipment but one person may be recording data while another is making adjustments or reading values, etc. Thus it is acceptable to photocopy the measurements section from another partner's lab book and paste it in to your own; try to ensure that your book has all of the necessary data. Please distribute the work equally between partners--it doesn't make sense for one person to be shouldering most of the work. The write-up at home should concentrate on the analysis and interpretation / discussion sections. You are welcome to share ideas during the lab and during the analysis, but the writeup should be your own, and at the end of the lab, each person should do her/his own interpretation and summary (sections V and VI). Some hints are:
Note that the class is 10 units, with 6 units in the lab. Thus you should not spend more than 3-4 hours on the analysis and writeup. Unpolished, but CLEAR work is perfectly acceptable.
In order to pass this class you must do the following:
Attendance is mandatory! Approximately 35% of your grade will be based on your in-class performance and 65% on the written work your turn in.
Your experiment should be written up in a standard laboratory notebook. Each student should write up the work independently though you will find yourselves sharing note taking duties while the experiments are conducted.
The completed lab write-ups for a given week should be due on a date that allows them to be graded and returned in time for the follow week's lab. We need to discuss this, but I propose the lab writeups are due on the following Monday, so that they can be graded between the two lab sessions. Late lab notebooks may earn up to 80% credit only.
Final copy of the term's work will be due on the last day of classes.
| Week of Spring Term | Week Beginning on Calendar Date | Laboratory Activity | Instructions | Pictures | Notes and Reading |
| Week 1 | 2 April | Introductory Meeting and Lab Tour | -- | -- | The first class meeting will last only about 45 mintues . |
| Week 2 | 9 April | Experiment 1: Radiometry / Photometry |
lab | pics | Melles Griot note on power measurement and photodiodes |
| Week 3 | 16 April | Experiment 2: Geometrical Optics |
lab | pics | note on test pattern
and, if you use the laser, Melles Griot note on shear plates
(also a follow-up from Expt 1)
|
| Week 4 | 30 April | Experiment 3: Polarizing Optics |
lab | pics coming soon |
michael has written a new lab for us in 2012!
textbook info on polarized light from the venerable Jackson |
| Week 5 | 7 May | Experiment 4: Optical Aberrations |
lab | pics |
Melles Griot notes on aberrations
and examples of spot diagrams;
manual info on Code V software in the absence of this handy software, here is how it was done |
| Week 6 | 14 May | Experiment 5: Spectroscopy |
lab | pics | Melles Griot notes on spectrometers
and dispersing prisms.
basics of spectrographs from James Graham |
| Week 7 | 21 May | Experiment 6: CCD Characteristics I. |
lab and lab appendix | pics |
Olympus applets illustrating
how to build a ccd
and
photons interacting with silicon
and
ccd clocking schemes
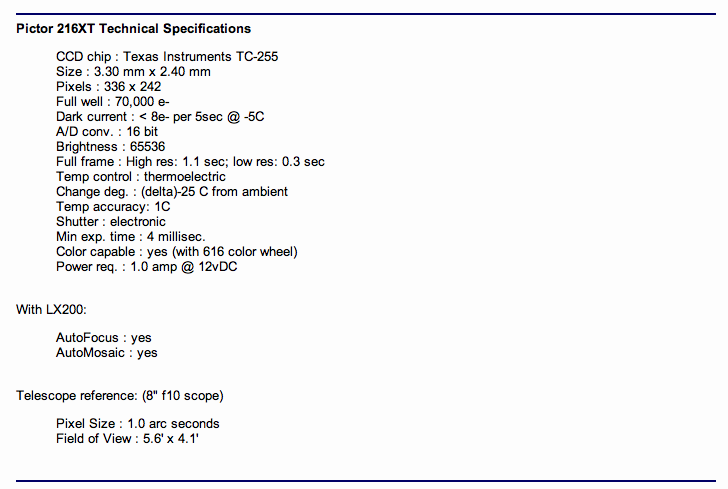
Part A ccd specs;
|
| Week 8 | 28 May | Experiment 7: CCD Characteristics II. |
lab | pics |
Microscopy applet illustrating
signal-to-noise
Alta-U4000 camera info note on IRAF software along with explanation of the fits file format of the data and the iraf fits conventions |
| Week 9 | 4 June | Experiment 8: Infrared Camera and Spectroscopy |
lab | pics |
tutorial on
infrared dectectors from Dick Joyce;
Edmund Optics notes on infrared optical materials; IRC-160 camera info; atmospheric transmission in the near-infrared |
| Week 10 | 11 June | Complete and turn in experimental write-ups | -- | -- | -- |
This course was originally put together by Jim McCarthy and has been improved / modernized over the years by several others including Chris Martin, Chuck Steidel, Andrew Blain and Lynne Hillenbrand.