The user interface of the Palomar Autoguider.
The following figure shows the observer's graphical user interface of
the autoguider.
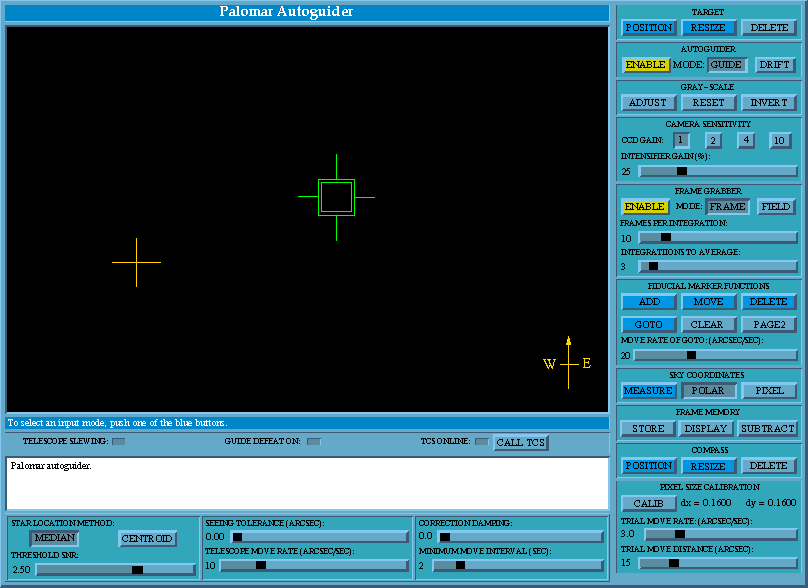
An overview of the user interface
The display is split into four logical areas. The large black window
is the image-display window. To its right is the main control area.
Below the image window is a status area, and below that is the
star-tracker configuration panel. Before elaborating on these areas,
the following subsections describe the general features of the user
interface.
Cursor usage in the image-display window
Several buttons in the main control area are colored light blue. Only
one of these remains depressed at a given time. The selected button
specifies which of a number of functions the mouse performs when the
cursor is in the image-display window. For example, when the
POSITION button of the compass panel is depressed, the compass
marker can be picked up with the mouse and dropped at a new
location. All of the available functions react similarly to user
input. Whenever a blue button is depressed, you can employ the
selected mouse function as follows. First press the left mouse button
briefly in the image-display window. Then move the cursor around the
window to adjust whatever parameter the selected function controls
(eg. the position of the compass marker). Then when you are satisfied
with the effect, press the left mouse button to adopt the adjusted
parameter. If you don't want to adopt the adjusted value, press the
right mouse button instead. This will abort the adjustment session and
reinstate the previously used values.
Step-by-step instructions are displayed in a single line of text just
below the image-display window. This should be sufficient for many
users, but more detailed directions can be found later in this
document.
There are three classes of buttons
Beware that not all buttons behave similarly. Some buttons, like the
blue cursor-mode buttons described above, are members of a set of mode
buttons. The buttons to the left of the "MODE:" labels in
the AUTOGUIDER and FRAME GRABBER control areas are examples of mode
buttons.
Other buttons turn an option on when the button is depressed, and off
when it is raised. Clicking on one of these buttons toggles its state
between on and off. The ENABLE buttons of the AUTOGUIDER and
FRAME GRABBER control areas are examples of on/off buttons.
The remaining class of buttons remains down only for as long as you
hold them down. These are used to initiate transitory operations. For
example, pressing the DELETE button in the TARGET control
area, deletes the target area marker.
If the labels on the buttons don't make it obvious which buttons
behave in which manner, either look up the confusing button in this
document, or simply try pressing the button to see what happens.

The above picture shows an example of a slider control. Sliders are
used to interactively change the value of a numeric parameter. The
precise value of the parameter is displayed to the left of the slider,
and this is reflected in the distance of the black rectangle from the
left edge of the slider. To change the value, place the cursor over
the slider, near where you want the black rectangle to go, then hold
down the left mouse button and drag the cursor along the slider until
the displayed value is satisfactory. Alternatively, to make fine
adjustments move the cursor to one side of the black rectangle and
click the right mouse button one or more times. Each click will cause
the rectangle to move a small amount towards the cursor and have a
corresponding effect on slider's value.
The main control area
The control area on the right side of the image-display window is
split into several panels of related controls. These are described
below.
The target control panel

This panel provides controls for manipulating the size and position of
the target area. When guiding is enabled, the autoguider will attempt
to keep the guide-star positioned at the center of the target
area. The target area is denoted by a nested pair of green boxes. The
margin between the boxes is used to estimate the background surface
brightness, so the guide-star should not extend into this region.
- If the guider is currently enabled, disable it
(see below).
- Press the POSITION button.
- Move the cursor into the camera window and click the left
mouse-button near where you want the target to appear, then let go.
- The target will now move wherever you move the cursor.
- Once the target is where you want it, click the left mouse button
again, and the target will anchor itself at the chosen position.
- The above operations can be aborted at any time by pressing the
right mouse button. The target will then return to its original
position.
To resize the target:
- If the guider is currently enabled, disable it
(see below).
- Press the RESIZE button.
- Move the cursor into the camera window and click the left
mouse-button close to a corner of the target area, then let go.
- The target area will now expand as you move the cursor away from
the center of the target, and shrink as you move it towards the
target center.
- Once the target has the desired size, click the left mouse button
again, and the target dimensions will freeze at the chosen size.
- The above operations can be aborted at any time by pressing the
right mouse button. The target will then revert to its original size.
Beware that the autoguider can become less sensitive as the target
area is increased.
If you don't intend to use the autoguider, but you do want its
display, the target marker can be deleted from the display by pressing
the DELETE button. This has the side effect of stopping guiding
if the autoguider is enabled. The target can subsequently be
resurrected by following the above
instructions for positioning the target.

This panel controls the state of the autoguider. The ENABLE
button is used to enable or disable the autoguider. The buttons to its
right are used to select one of two modes of guiding.
When guiding is enabled, the ENABLE button remains pressed
down. When guiding is disabled the button pops up and is colored
bright yellow (as a visual cue that guiding has stopped). To toggle
between guiding and not guiding, press the button. It will then change
to the opposite state.
The latest estimate of the guide star position will be indicated by a
cross hair within the target area. When the signal to noise ratio of
the guide star is sufficient for guiding, four lines will also be seen
to extend outwards from the middle of the four sides of the target
area. At other times, when the guide star is obscured by a cloud, or
poor seeing diminishes the visibility of the star, guiding will
automatically cease until the guide-star reappears.
Selecting a mode of guiding
Before enabling the guider, make sure that the appropriate guiding
mode is selected. The available modes are:
- GUIDE: This is the normal guiding mode. In this mode the
telescope is moved to keep the guide star within the target
area.
- DRIFT: In this mode, instead of moving
the telescope, the target marker is moved to follow the
guide-star. This mode is used by the automatic
camera-geometry calibration facility. It could also be used
from the Tcl Autoguider interface to obtain a record of the
trajectory of an object as it drifts through the camera field.
The Gray-scale control panel

This panel controls the contrast and brightness of the displayed
camera image. The default contrast and brightness maps all available
brightness levels in the image to colors spanning from black to white
(or vice versa when the INVERT button is pressed). This default
can be restored at any time by pressing the RESET button.
How to adjust the contrast and brightness of the image
- Press the ADJUST button.
- Move the cursor into the camera window and click the left mouse
button somewhere near the center of the window, then let go.
- The contrast and brightness will now change as the cursor is
moved within the camera window. As the cursor is moved from the
left edge of the window to the right edge, the brightness will
increase from its minimum to its maximum (or the reverse if the
INVERT button is pressed). As the cursor is moved from the
bottom of the window to the top the contrast of the image will
increase from its minimum to its maximum.
- Once the desired appearance has been achieved, press the left mouse
button a second time to adopt it. Note that as soon as you do
this, not only will the display show the new selection, but the
autoguider will start to use it. So before committing to a new
appearance, be sure that the guide-star retains sufficient
contrast against the background for the autoguider to continue
functioning.
- The above operations can be aborted at any point by
pressing the right mouse button. If you just want to experiment
with changing the appearance, without effecting the autoguider,
follow the above directions, but when you have finished, instead
of pressing the left mouse button to adopt the new appearance,
press the right mouse button to revert to the old one.
Toggling reverse-video
The INVERT button provides a reverse video option. This can be
toggled on and off by pressing the INVERT button.
The Camera-Gain control panel
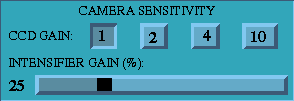
The Xybion camera that the autoguider was designed for, contains
both an image-intensifier and a gain-controlled CCD. There are three
hard-wired CCD gains, 1, 2 and 4. The x10 gain is actually
wired to the x4 because although the Xybion controller unit
provides a x10 input, Xybion cameras only support up to x4.
Adjusting the CCD gain
One of the CCD gain buttons is always selected, and the number on its
cap denotes the gain that is currently in use. If you press one of
the other buttons, the previously selected button will pop up and the
new one will become depressed.
Adjusting the image-intensifier gain
Before changing the image-intensifier gain, adjust the contrast and
brightness of the display until something (eg. background noise or a
star) is visible. Otherwise you could end up increasing the
intensifier gain dangerously high, just because the displayed
brightness was too low to see the resulting image. Note that whereas
the intensifier gain changes continuously as the slider is being moved, the effect doesn't become
visible until the end of the next averaged and/or integrated frame is
displayed; so to avoid damaging the intensifier, be careful not to
increase its gain too quickly when the image update rate is low.
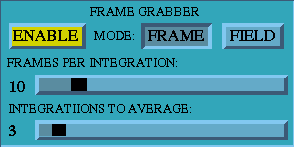
This panel controls how the autoguider collects camera frames for
display and guiding. The ENABLE button should normally be
pushed down. This enables the camera, and the capturing of camera
frames. At the end of the night I suggest that you pop up this
button. Not only does this halt frame capturing, but it also sets and
holds the image-intensifier gain at zero to prevent damage.
The two mutually-exclusive mode buttons
FRAME and FIELD select between capturing integrated
frames and capturing individual fields. Camera frames are actually
formed from two interlaced fields, so by reading out fields instead of
frames, the autoguider sees twice as many images per second, sampled
with half as many lines. Field mode was written for possible future
use in fast guiding. The only possible use to normal guiding is to
double the potential speed of drift mode
guiding. Note that the integration and averaging sliders are ignored
in field mode.
The FRAMES PER INTEGRATION slider specifies how many frame
intervals that the frame-grabber waits before reading out an
integrated image from the camera's CCD. Similarly, the INTEGRATIONS
TO AVERAGE slider specifies how many of these integrated frames
to average before displaying the result. The delay between displayed
frames is equal to the product of these selections, multiplied by the
basic 30th second sampling interval.
Note that the available frame buffers are only 8-bits deep, so
averaging multiple 8-bit frames in-place results in some loss of
information. The actual amount of averaging achieved depends on the
brightnesses of the pixels being averaged. To be precise, only
the first N frames of a mean contribute pixels with
brightness values of 2^(N-1). Thus it is pointless to
average too many frames if the features that you want to enhance are
inherently dim. For more details see the architecture documentation on
the Frame Grabber task.
The Fiducial Marker control panel
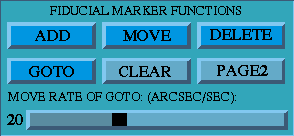
This panel provides a way to mark locations of interest in the camera
window. Any number of markers can be placed in the camera
window. These can then be moved, deleted, or act as the targets of
cursor-directed telescope moves. You can actually define two pages of
markers, and alternate between them by pushing the PAGE2 toggle
button. To clear the displayed page of markers press the CLEAR
button.
Adding a new marker
- Press the ADD button.
- Move the cursor into the camera window.
- Press the left mouse button and let go.
- A new marker will now appear, and it will move wherever you move
the cursor.
- Once you have moved the marker to the desired position, press the
left mouse button a second time to anchor it there.
- The above operations can be aborted at any point by pressing the
right mouse button. The new marker will then be discarded.
Moving an existing marker
- Press the MOVE button.
- Move the cursor close to the marker that you wish to move.
- Press the left mouse button and let go.
- The marker will now follow the motion of the cursor.
- Once you have moved the marker to the desired position, press the
left mouse button a second time to anchor it there.
- The above operations can be aborted at any point by pressing the
right mouse button. The marker will then return to its original
location.
Erasing a displayed marker
- Press the DELETE button.
- Move the cursor close to the marker that you wish to delete.
- Press the left mouse button and let go.
- The marker will disappear.
How to command a telescope move with the cursor
When the GOTO button is depressed, the mouse can be used to
move the telescope. An arrow drawn with the cursor marks the extent
and direction of the move, such that an object at the tail of the
arrow will be move to the head of the arrow. The destination of the
move can either be an arbitrary image location, or be the precise
center of a previously placed marker. The speed of the telescope move
is set by the value of the MOVE RATE OF GOTO slider. Note that
high move rates will result in longer settling times when the
telescope reaches its destination.
To move the telescope:
- Press the GOTO button.
- Move the cursor into the camera window.
- Select the destination position of the move by clicking the left
mouse button over the desired point. Then let go. Note that if
you click within the rectangular bounds of a marker, then the
destination arrow will snap to the center of the marker.
- An arrow will now be drawn, with its head at the selected
destination and its tail following the motion of the cursor.
- Move the cursor until the tail of the arrow is over the
astronomical object to be moved, then press the left mouse button
a second time. The telescope will now move the object at the
tail of the arrow to the position of the head.
- The above operations can be aborted by pressing the right mouse button.
The Sky Coordinate control panel

This panel allows you to draw a straight line with the cursor and
measure its direction and length on the sky in a variety of
formats. To make such a measurement:
- Press the MEASURE button.
- Move the cursor into the camera window.
- Click the left mouse button at the desired origin of the
measuring line, then let go.
- A line will now appear, anchored at the selected origin. Its
other end, augmented with an arrow head to denote the direction
of the measurement vector, will follow the motion of the cursor.
The dimensions of the vector will be displayed at the top of the
window.
- To change the displayed format of the dimensions, move back to the
control area and toggle the POLAR and/or PIXEL
buttons. The former selects between polar and rectangular display
formats, while the latter selects between arc-second and
camera-pixel units. Once you have selected the desired format,
move the cursor back into the camera window and measurement will
resume with the new display format.
- When you have finished making the measurement, press either the
left or the right mouse buttons.
The Frame Memory control panel

A spare frame buffer is available for recording an image for later
inspection. To record a copy of the currently displayed image press
the STORE button. To toggle between displaying the current
camera-image and a stored image, press the DISPLAY button
(remember that you will need to press it again to return to the
real-time display). To display the difference between subsequently
received camera frames, and a previously stored frame, press the
SUBTRACT button. Press it again to return to the un-differenced
display.
The subtraction facility may be useful in removing hot spots. To
experiment with this, first find a blank area of sky and set the
integration time to the same value that you plan to observe
with. Record this image by pressing the STORE button. Then
press the SUBTRACT button so that subsequent images will have
the hot spots removed.
Note that the stored image will be discarded if you press the the
FRAME or FIELD buttons on the frame-grabber
panel. Also note that if the integration time of the stored image is
higher than that of the observed image then you may end up subtracting
a inappropriately large background offset from the observed image.
The Compass control panel

This panel allows you to position, resize or erase the compass rose.
- Press the POSITION button.
- Move the cursor into the camera window and click the left
mouse-button near where you want the compass to appear, then let go.
- The compass will now move wherever you move the cursor.
- Once the compass is where you want it, click the left mouse button
again, and the compass will anchor itself at the chosen position.
- The above operations can be aborted at any time by pressing the
right mouse button. The compass will then return to its original
position.
To resize the compass:
- Press the RESIZE button.
- Move the cursor into the camera window and click the left
mouse-button close to the arrow-head of the compass then let go.
- The compass will now expand as you move the cursor away from
the center of the compass, and shrink as you move it towards the
compass.
- Once the compass has the desired size, click the left mouse button
again, and the compass dimensions will freeze at the chosen size.
- The above operations can be aborted at any time by pressing the
right mouse button. The compass will then revert to its original
size.
If you don't want the compass to be displayed, press the DELETE
button. The compass will then disappear. It can be resurrected at a
later time by following the above
instructions for positioning the compass.
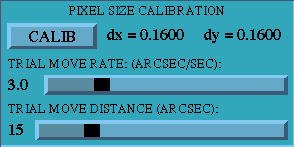
This panel is the interface to a facility that measures the size and
reflection parity of the pixels of the current guide camera. The
currently adopted pixel sizes are also displayed. Without a good
calibration, the autoguider will not guide correctly, mouse directed
moves will miss their targets, and vector measurements will be
incorrect.
To re-calibrate the geometry of the camera wrt the sky.
First use the TRIAL MOVE RATE and TRIAL MOVE DISTANCE
sliders to specify how fast and how far the calibration procedure
should move the telescope. The move rate should be low enough that an
object in the image won't move more than half of the width of the
target area between displayed image updates. The move distance should
be large enough to cover as many pixels as possible without causing
the star to exit the displayed image. It isn't important that you
guess correctly first time because if you guess wrong, the process will
simply be aborted when the guide-star is lost, and the telescope will
be returned to its original position so that you can try again.
- Disable the guider.
- Move the telescope until a bright guide-star is positioned near
the center of the camera window.
- Roughly center the target area on the guide star.
- Press the CALIB button.
- The autoguider will automatically now perform the following steps:
- Change to DRIFT guider mode.
- Enable the guider.
- Center the target area on the guide star.
- Move the telescope north while keeping the target area
centered on the star.
- Stop and take a measurement of the target displacement from
where the move started.
- Move the telescope back to its starting position while
keeping the target area centered on the star.
- Move the telescope east while keeping the target area
centered on the star.
- Stop and take a measurement of the target displacement from
where the move started.
- Move the telescope back to its starting position while
keeping the target area centered on the star.
- By examining the pixel displacements that resulted from
the Northward and Eastward moves, the autoguider deduces
the rotation angle of the image and whether it is reflected.
- Move the telescope diagonally such that the star moves at
approximately 45 degrees over the displayed image.
- Stop and take a measurement of the target displacement from
where the move started.
- Move the telescope back to its starting position while
keeping the target area centered on the star.
- Compare the measured target area displacements to the
commanded telescope moves to determine the dimensions
of the pixels.
If the star exits the target area while the calibration is in
progress, the calibration will abort. If this happens, and the reason
isn't simply that a cloud obscured the guide-star, then it means that
the trial move rate and/or distance need to be reduced. Once you
adjusted the offending parameter, repeat the above process to make
another attempt at calibration. Once you have succeeded in getting a
measurement, the newly determined horizontal and vertical pixel sizes
will be displayed next to the dx = , and dy =
labels in the calibration panel. The rotation angle and reflection
parity will be indicated by the compass rose.
The configuration of the autoguider
While it is hoped that the default autoguider configuration will be
sufficient for most experiments, less common scenarios such as guiding
on an object behind a slit, or guiding on a very weak star may require
some adjustments. The control area beneath the image-display window is
provided for this purpose. The controls contained in its three panels
are described below.
Adjustment of the tracking algorithm

Two algorithms are provided for locating the position of a guide star
within the target area. Both algorithms operate on row and column sums
of pixel intensities within the target area.
- Median
Horizontally, the median location of the guide star is at a
vertical-line in the target area that separates equal amounts of
flux to its left and right within the target area.
- Centroid
Horizontally, the gray-scale centroid of the guide star is the
intensity weighted mean column-index over the width of the target
area.
Of these algorithms, the median algorithm is preferable for normal
guiding. It is less susceptible to isolated noise spikes than the
centroid method. However for guiding on an object from which light
spills over both edges of a slit, the centroid method is better
because the centroid will be at the intensity weighted mean of the
centroids of the two spillover arcs, (ie. somewhere in the slit),
whereas the median position will oscillate between whichever of the
spillover arcs is currently the brightest.
Before the above algorithms are applied to determine the guide-star
location, background subtraction is performed on the target area. This
helps to remove noise and also to prevent the row and column sums from
being biased by dim extended emission, such as a galactic disk. Note
that extended emission could otherwise contribute more to row and
column sums than a compact bright core.
The value of the background that is subtracted is the sum of two
components:
- An constant offset, equal to the mean brightness of the margin
that surrounds the target area.
- The standard deviation of the brightnesses of pixels in the
margin of the target area, multiplied by the value of the
THRESHOLD SNR slider.
The value of the THRESHOLD SNR slider thus determines the
limiting brightness above which pixels contribute to the median and
centroid calculations.
Guiding constraints
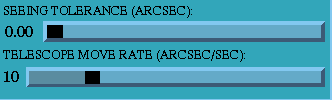
The SEEING TOLERANCE slider can be used to guard against
guiding on small offsets that are solely due to seeing variations. It
sets the width and height of an error box surrounding the center of
the target area. Only when the guide-star is seen to exit this box
will a correction be made to move it back to the center.
The TELESCOPE MOVE RATE slider sets the rate at which the
telescope is moved when re-centering a star. If this is set too low
compared to the correction interval, then a given correction may not
have time to finish before the next correction is measured, and the
result will be oscillation. An optimal value that seems to avoid both
this problem and the problems of overshoot at high move rates, is 10
arc-seconds/second.
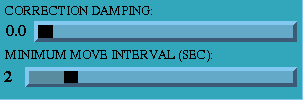
The CORRECTION MULTIPLIER slider determines whether the
guide-star is moved all of the way back to the target center in a
single move. This is usually the desired behavior, so the value of the
slider should normally be set to unity. However when guiding on an
object that is completely obscured by a slit, and the object starts to
exit one side of the slit, one doesn't want the emerging edge of the
star to be moved all the way back to the center of the slit, because
the other edge of the star would then probably exit the other side of
the slit! To counter this, decrease the correction multiplier. The
autoguider will then only move the edge of the star the specified
fraction of the distance between it and the target center (which I am
assuming is positioned at the center of the slit). The appropriate
scale factor to choose depends on the visible dimensions of the star,
compared to the width of the slit. If the star and the slit are
roughly the same width, then a small factor will be needed. In such
cases it is probably better to turn up the intensifier gain until
light from the star spills over both edges of the slit, then use the
centroid algorithm, but don't do this if there
are any other stars in the field that are bright enough to burn out
the intensifier at such high gains.
The MINIMUM MOVE INTERVAL slider sets the maximum frequency at
which the autoguider will move the telescope to correct for the
guide-star drifting. The TCS can't cope with updates of less than a
second, and in practice the frequency will often be limited by the
guide camera image update rate. Given that seeing effects generally
swamp telescope tracking errors on intervals of a few seconds,
increasing the update interval is one way to avoid tracking
seeing-generated offsets.
Martin Shepherd (mcs@astro.caltech.edu).