Document Scanning
The Caltech Astronomy Department has an Epson Perfection 1650 Photo Series flatbed scanner. It is located in Cahill 249, attached to auriga, a Mac OS X machine.
It is a Flatbed color image scanner with 1600 dpi resolution. It has Maximum Scan area about 8.5" X 11.7". The Transparency Unit needed to scan negatives is also available.
Adobe Photoshop and Adobe PhotoDeluxe are available on taurus for simple photo editing and page development. You can use "File->Input" option from Adobe Photoshop to set the source to scanner.
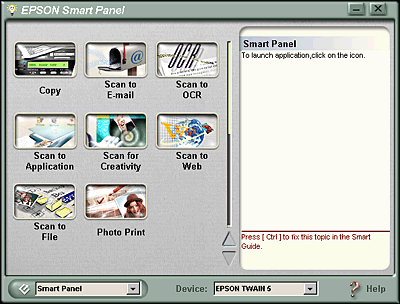
You can use a guest account named as "ADPF Guest" to log in. Please help@astro at x4006 or x6462 in Cahill 227 for the password. Once you are logged in click on EPSON Smart Panel icon from Applications. From the available options as shown,

Scan to File: Use this application to scan, convert and then save the scanned image to a specific folder.
Scan to OCR: Use this application to scan and convert images to text. The converted text can be saved or sent to a word processing application.
Scan to file to scan a image:
- Place the image(s) to be scanned face down on the flatbed, and close the scanner cover.
- Select the Scan to File option.
- EPSON TWAIN(Scanner software) is set to manual mode to adjust settings manually. This will give you a window with options to set Image Type, Resolution, Scale and controls to color management. The most important thing to remember when scanning is to select the correct image type and best resolution for your scan. Please see Recommended Settings below.
- After adjusting your settings, click on the scan button. When scan completes, the Scan to File dialog box opens (this takes a few seconds)
- You can see a larger version of an image by double-clicking it.
If you want rename the file from the default name (File001), click on "File001".
If you do not want to save file, click the checkbox to de-select it.
If you want to scan more documents, place them on the scanner bed, close the scanner cover and then click Scan More. When you are finished scanning, click Finish. - At the next dialog box, you may specify a file path and file format. When you are finished, click Save. The photo is saved in your selected folder.
Scan to OCR to scan convert images to text:
- Place the image(s) to be scanned face down on the flatbed, and close the scanner cover.
- After selecting the Scan to OCR option, the Scan to OCR dialog box opens (this takes a few seconds)
- Click to Scan and then click on Recognize. A window to launch the assistant appears. Select the application (Notepad/Wordpad). Save your text file to the folder you want by selecting Save option from the application you have selected.
Recommended Settings:
| Type of image | Recommended Image Type | Print Resolution |
|---|---|---|
| Photograph | Color Photo | 300 dpi |
| Small photo (to enlarge) | Color Photo | 300 to 3200 dpi |
| Magazine | Color Photo | 300 dpi |
| Newspaper (text only) | Text | 400 dpi |
| Text for OCR | Text | 400 dpi |
| Text with images | Color Documents | 400 dpi |
| Line Art | Line Art | 300 to 3200 dpi |
| 35mm film (negative) | TPU: Color Neg. Film, TPU: Monochrome Neg. Film | 300 to 3200 dpi |
| 35mm slide | TPU: Pos. Film | 300 to 3200 dpi |
